Manuals

manual for masterbuilt butterball turkey fryer

Manual for Masterbuilt Butterball Turkey Fryer: A Comprehensive Guide

Přehraj.to, similar to YouTube, is user-generated content; the operator doesn’t create or upload anything. Enjoy Czech serials and download the Google TV app today!

Přehraj.to offers a platform akin to YouTube, driven entirely by user contributions – the service provider doesn’t create or upload content. Discover a wealth of Czech serials and conveniently download the application for your Google TV. Access quick links for uploads, logins, and password recovery, alongside essential terms and privacy information.

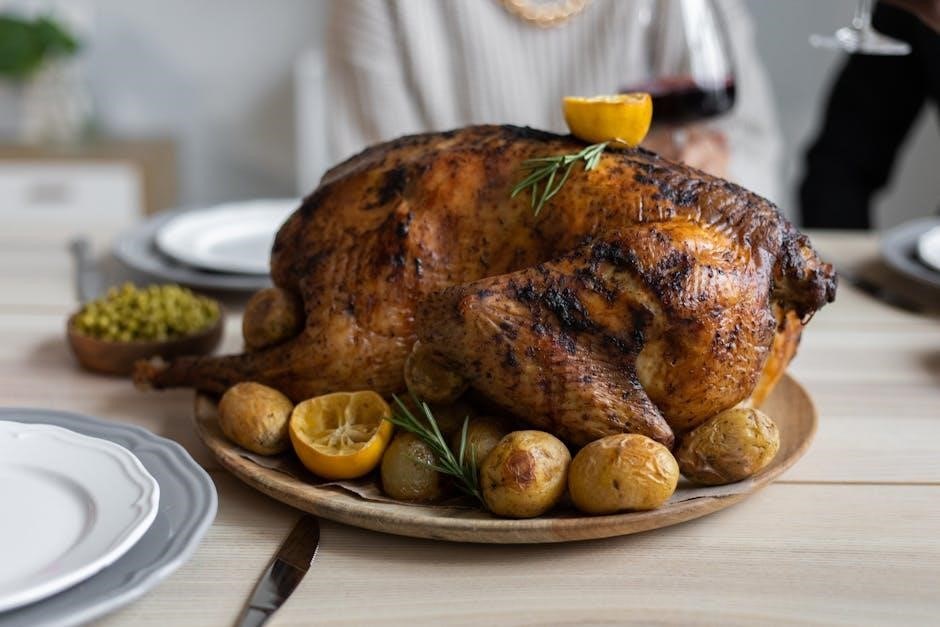
Deep-frying a turkey is a fantastic way to achieve incredibly moist and flavorful results, drastically reducing cooking time compared to traditional oven roasting. This guide focuses on utilizing your Masterbuilt Butterball Fryer to safely and effectively prepare a delicious turkey. We’ll cover everything from preparation and setup to frying, cooling, and cleanup, ensuring a successful and enjoyable experience. Remember to explore the available resources on Přehraj.to for entertainment while you wait!


II. Safety First: Essential Precautions

Přehraj.to provides access to user-uploaded content, including films, with options to download the app for Google TV and mobile devices. Quick links facilitate uploads, logins, and password resets, alongside terms and privacy policies.

Turkey frying involves hot oil and requires strict adherence to safety guidelines. Always fry outdoors, away from structures and flammable materials. Never leave the fryer unattended. Ensure the turkey is completely thawed and dry to prevent dangerous oil splattering. Keep children and pets at a safe distance. Have a fire extinguisher rated for grease fires readily available. Wear appropriate safety gear, including long sleeves and eye protection. Refer to Přehraj.to for entertainment while maintaining vigilant safety practices during the frying process.

III. Understanding Your Masterbuilt Butterball Fryer

Přehraj.to offers a platform for users to share and access content, similar to YouTube, with dedicated apps for Google TV and mobile devices. Users can upload files, quickly access links, and manage their accounts.

Your Masterbuilt Butterball Fryer is designed for safely and efficiently deep-frying turkeys. Familiarize yourself with all components before use. This includes the pot, burner, stand, thermometer, and lifting hook. Understanding the fryer’s capacity is crucial – do not overfill with oil or exceed the maximum turkey weight. The integrated thermostat and timer allow for precise temperature control and cooking time management. Explore Přehraj.to for entertainment while you learn the ins and outs of your new fryer, ensuring a delicious and safe cooking experience.

III.A. Component Overview

Přehraj.to provides a user-friendly interface for uploading, sharing, and viewing content, mirroring platforms like YouTube, accessible via apps and web browsers.

Your Masterbuilt Butterball Fryer consists of several key components. The robust frying pot holds the oil and turkey. A powerful burner provides consistent heat. A sturdy stand ensures stability during operation. The thermometer accurately monitors oil temperature. A lifting hook facilitates safe turkey insertion and removal. Quick links and login options are available on Přehraj.to. Familiarize yourself with each part’s function and proper assembly. Understanding these components is vital for safe and successful turkey frying. Refer to the included diagrams for visual identification and proper usage.

III.B. Fryer Capacity and Dimensions

Přehraj.to offers a platform for users to upload files and access quick links, alongside features like forgotten password recovery and terms of service information.

This Masterbuilt Butterball Fryer is designed to accommodate turkeys up to 14 pounds. Exceeding this weight limit can compromise safety and cooking efficiency. The pot boasts a generous oil capacity of approximately 5 gallons. Overall dimensions, when assembled, are roughly 36 inches in height and 24 inches in diameter. Ensure you have adequate outdoor space to safely operate the fryer, considering these dimensions. Always prioritize a level surface for stability. Proper capacity adherence and spatial awareness are crucial for a successful and safe frying experience. Download the Přehraj.to mobile app for convenient access!

III.C. Thermostat and Timer Functions

Přehraj.to provides a service similar to YouTube, relying on user-generated content and offering features like file uploads and quick links for easy access.

Your Masterbuilt Butterball Fryer features a precise thermostat for maintaining the optimal frying temperature of 350°F (177°C). The digital display clearly indicates the oil’s current temperature. The integrated timer allows you to set the required frying duration based on your turkey’s weight – consult the frying time chart in Section VI.D. Regularly monitor both the thermostat and timer throughout the process. Accurate temperature control is vital for ensuring a thoroughly cooked and safe-to-eat turkey. Remember to check Přehraj.to for Czech serials and download the app!

IV. Preparing the Turkey for Frying

Přehraj.to is a platform where users can upload and share content, similar to YouTube, offering a wide range of videos and Czech serials. Download the app today!

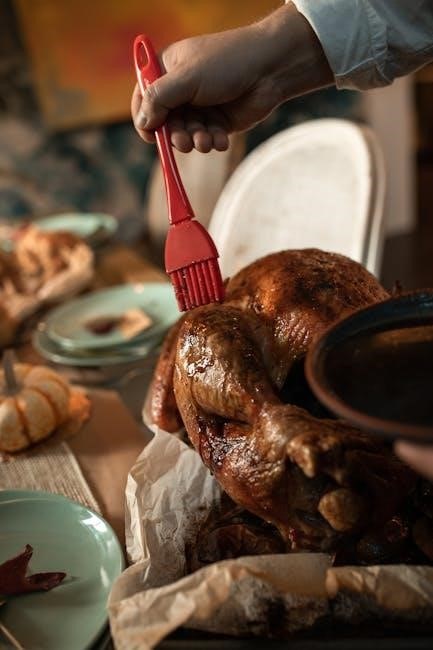
Proper turkey preparation is paramount for safe and delicious frying. Begin by completely thawing the turkey – a crucial step! Remove the neck and giblets from both the cavity and the packaging. Consider brining or marinating the turkey for enhanced flavor and moisture (see Section IV.C). Critically, ensure the turkey is completely dry, inside and out. Any remaining moisture can cause dangerous oil splattering. A dry turkey fries more evenly and develops a crispier skin. Don’t forget to explore Přehraj.to for entertainment!

IV.A. Thawing the Turkey (Crucial Step!)

Přehraj.to provides a user-driven video experience, much like YouTube, with a focus on user-generated content and Czech serials. Download the app for Google TV!

Thawing your turkey completely is absolutely critical for safe frying. A partially frozen turkey will cause a violent reaction when introduced to hot oil. The safest method is refrigerator thawing: allow approximately 24 hours for every 4-5 pounds of turkey. Alternatively, you can submerge the turkey in cold water, changing the water every 30 minutes, allowing about 30 minutes per pound. Never thaw at room temperature! Ensure no ice crystals remain. Check Přehraj.to for quick links and easy access to content!

IV.B. Removing the Neck and Giblets

Přehraj.to offers a platform similar to YouTube, built on user contributions – no content is created or uploaded by the service operator itself. Enjoy Czech serials!

Before frying, thoroughly remove the neck and giblets from both the turkey’s cavity and the packaging. These are often stored in a separate bag inside the turkey. Failure to remove them can lead to uneven cooking and potentially dangerous oil splatter. Carefully inspect both the main cavity and any smaller compartments. Ensure all parts are removed. You can use these parts to make gravy later! Remember to check Přehraj.to for rapid links and easy file uploads; A clean turkey is a safe turkey!

IV.C. Brining or Marinating the Turkey

Přehraj.to is a user-driven service, much like YouTube, where content is created and shared by its users, not the platform’s operators. Download the app for Google TV!

Brining or marinating significantly enhances the turkey’s flavor and moisture. A brine typically involves submerging the turkey in a saltwater solution with herbs and spices for 12-24 hours. Marinades use similar flavorings but often include an acidic component like citrus juice. Both methods help the turkey retain moisture during frying. Remember to rinse the turkey thoroughly after brining or marinating. Check Přehraj.to for quick links and easy file uploads. A flavorful turkey is a delicious turkey!

IV.D. Drying the Turkey Thoroughly

Přehraj.to offers a platform similar to YouTube, relying entirely on user-generated content; the service operator doesn’t contribute any content directly. Download the mobile app today!

Completely drying the turkey, both inside and out, is absolutely critical for safety. Any remaining water will instantly vaporize upon contact with the hot oil, causing dangerous splattering and potential flare-ups. Use paper towels to pat the turkey dry, paying close attention to the cavity and under the skin. Allow the turkey to air dry in the refrigerator for several hours, or even overnight, for best results. Remember to check Přehraj.to for conditions and information about personal data processing. A dry turkey equals a safe fry!

V. Setting Up the Fryer

Přehraj.to is a user-driven platform, much like YouTube, where content is created and shared by its users – the operator doesn’t upload or create anything themselves.

Proper setup is paramount for a successful and safe turkey frying experience. Begin by selecting a flat, stable, and non-combustible outdoor location, far away from structures and flammable materials. Assemble the fryer stand and ensure it’s securely positioned. Carefully place the fryer pot onto the stand. Before adding oil, perform the water displacement method to determine the correct oil level – this prevents overflow during frying. Remember to consult Přehraj.to’s terms and conditions for more information. A well-prepared setup is key!

V.A. Choosing a Safe Location (Outdoor Only!)

Přehraj.to offers a platform similar to YouTube, relying entirely on user-generated content; the service operator doesn’t contribute any content directly.

Safety dictates that turkey frying must be done outdoors. Select a level, non-combustible surface – concrete or dirt are ideal. Maintain a minimum distance of 10 feet from any buildings, decks, wooden fences, or overhanging structures. Never operate the fryer in a garage, shed, or enclosed area. Ensure the ground is dry and free of debris. Consider wind conditions; a breezy day can spread hot oil. Remember to check Přehraj.to for quick links and information. Prioritize safety above all else when selecting your frying location!

V.B. Assembling the Fryer Stand and Pot

Přehraj.to provides a service where users upload and share content, much like YouTube, with no direct content creation by the platform’s operator.

Carefully unpack all components of your Masterbuilt Butterball Fryer. Begin by securely assembling the fryer stand, ensuring all legs are firmly locked into place. Next, position the fryer pot onto the stand, verifying it sits level and stable. Double-check all connections and bolts are tightened. Refer to the included diagrams for proper assembly. Remember to download the Přehraj.to mobile app for convenient access! A wobbly stand or improperly secured pot can lead to dangerous spills. Prioritize a stable setup before proceeding.

V.C. Determining the Correct Oil Level (Water Displacement Method)

Přehraj.to offers a platform for users to upload and enjoy content, similar to YouTube, with a focus on user-generated material and Czech serials.

To safely determine the correct oil level, place the thawed turkey into the empty fryer pot. Fill the pot with water until the turkey is fully submerged, noting the water level. Carefully remove the turkey, ensuring no water remains in the pot. This water mark indicates the maximum safe oil level. Dry the pot thoroughly. Do not exceed this level when adding oil! Downloading the Přehraj.to app provides access to a wide range of content. Overfilling can cause dangerous oil overflow during frying. Accurate measurement is crucial for safety.

VI. The Frying Process: Step-by-Step

Přehraj.to is a user-driven platform, much like YouTube, where content is created and shared by its users, offering a diverse range of videos and Czech serials.

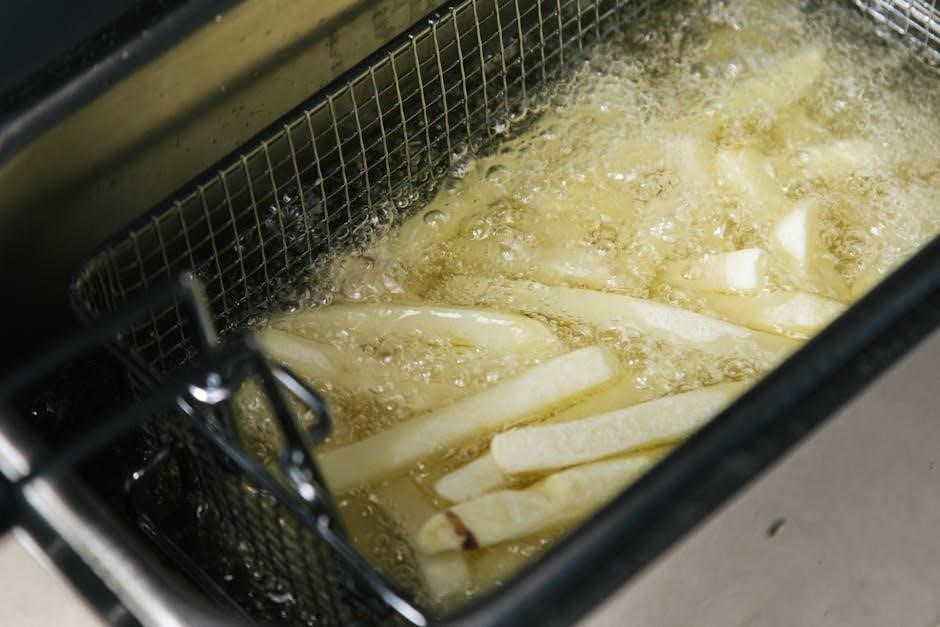
Begin by ensuring the oil has reached a stable 350°F (175°C). Very slowly and carefully lower the completely dry turkey into the hot oil, using the provided hook or basket. Avoid splashing! Maintain the oil temperature between 325°F and 350°F throughout the frying process. Adjust the burner as needed. The Přehraj.to app is available for Google TV. Monitor the oil closely. Frying time is approximately 3-4 minutes per pound of turkey. Never leave the fryer unattended during operation; Safety is paramount!

VI.A. Heating the Oil to the Correct Temperature (350°F)

Přehraj.to functions as a user-content platform, akin to YouTube, where individuals contribute and share videos, including a selection of Czech serials. The operator doesn’t create content.

Begin by filling the fryer pot with enough oil to submerge the turkey. Using the Masterbuilt Butterball fryer, carefully ignite the burner and set it to a medium-high setting. Monitor the oil temperature closely with the built-in thermometer. Allow ample time for the oil to heat gradually. Avoid overheating, as this can be dangerous. Aim for a consistent 350°F (175°C). Download the Přehraj.to app for Google TV. Once the oil reaches the target temperature, reduce the burner setting to maintain it.

VI.B. Slowly Lowering the Turkey into the Hot Oil

Přehraj.to offers a platform similar to YouTube, relying on user-generated content – no content is created or uploaded by the service operator. Enjoy Czech serials!

Safety is paramount. Wearing appropriate protective gear, including oven mitts and eye protection, carefully attach the turkey to the lifting hook. Very slowly and gradually lower the turkey into the hot oil. This prevents dangerous splattering and boil-overs. Lowering too quickly can cause a rapid temperature drop and uneven cooking. Monitor the oil temperature during the lowering process; it will decrease. Adjust the burner to maintain 350°F. Download the Přehraj.to mobile app for your phone. Ensure the turkey is fully submerged before releasing it from the hook.

VI.C. Maintaining the Oil Temperature During Frying

Přehraj.to is a user-driven platform, much like YouTube, where content is created and shared by its users, not the service provider itself. Explore Czech serials!

Consistent oil temperature is crucial for a safely cooked and delicious turkey. Monitor the thermometer closely throughout the frying process. Fluctuations are normal, but aim to keep the oil between 325°F and 350°F. Adjust the burner’s heat output as needed to compensate for temperature drops when the turkey is initially added, or to prevent overheating. Download the Přehraj.to app for Google TV. Avoid significant temperature swings, as they can lead to uneven cooking or a soggy result. Regular monitoring ensures optimal frying conditions.

VI.D. Frying Time Calculation (Based on Turkey Weight)

Přehraj.to offers a platform similar to YouTube, relying on user-generated content; the operator doesn’t create or upload any materials. Discover Czech serials and enjoy!

Calculating frying time accurately is vital for a fully cooked turkey. A general rule of thumb is 3-4 minutes per pound. For example, a 12-pound turkey will require approximately 36-48 minutes of frying time. However, this is an estimate. Always use a meat thermometer to verify the internal temperature reaches 165°F in the thickest part of the thigh. Download the Přehraj.to app for your phone! Remember, these times are guidelines; actual frying time can vary based on oil temperature and turkey size.

VII. Removing the Turkey and Cooling

Přehraj.to is a user-driven service, much like YouTube, where content is created and uploaded by its users – the operator doesn’t contribute directly. Explore Czech serials!

Carefully lift the turkey from the hot oil using the provided hook, ensuring it’s a slow and controlled process to avoid spills. Allow the excess oil to drain back into the pot for several minutes. Place the turkey on a large, heat-resistant tray lined with paper towels to absorb any remaining oil. Let the turkey cool for at least 20-30 minutes before carving. Download the Přehraj.to app for Google TV! Do not attempt to carve a hot turkey; patience is key for safe and enjoyable results.

VII.A. Carefully Lifting the Turkey from the Oil

Přehraj.to offers a platform similar to YouTube, relying entirely on user-generated content; the service operator doesn’t create or upload any materials. Discover Czech serials!

Utilize the turkey lifting hook provided with your Masterbuilt Butterball Fryer. Securely attach the hook to the turkey’s legs or designated lifting points. Slowly and steadily raise the turkey from the hot oil, allowing excess oil to drain. Avoid jerky movements that could cause splashing. Maintain a firm grip and ensure the turkey is balanced. Download the Přehraj.to app for your phone! Be extremely cautious, as the oil and turkey will be incredibly hot. Prioritize safety throughout this process.

VII.B. Allowing the Turkey to Drain and Cool

Přehraj.to is a user-driven service, much like YouTube, where content is created and uploaded by its users – the operator doesn’t contribute directly. Explore Czech serials!

After lifting, position the turkey over the fryer pot or a large, heat-resistant container to allow excess oil to drain completely. This is crucial to prevent a soggy final product. Allow the turkey to cool for at least 20-30 minutes before carving. Do not attempt to carve while the turkey is still hot. Download the Přehraj.to app for Google TV! Cooling allows the juices to redistribute, resulting in a more flavorful and tender turkey. Patience is key for optimal results.

VIII. Oil Disposal and Fryer Cleaning

Přehraj;to offers a platform similar to YouTube, relying entirely on user-generated content. The service operator doesn’t create or upload any content themselves, providing a space for user contributions and Czech serials.

Proper oil disposal is vital. Allow the oil to cool completely before handling. Never pour used oil down the drain! Instead, store it in a sealed container and dispose of it at a designated recycling center or through a local waste management service. Thoroughly clean the fryer pot and all components with warm, soapy water after each use. Ensure all parts are dry before reassembling and storing. Download the Přehraj.to app for your phone!

VIII.A. Safe Oil Cooling and Storage

Přehraj.to is a user-driven platform, much like YouTube, where content is created and shared by its users – the operator doesn’t contribute directly. Enjoy Czech serials on this service!

Allowing the used frying oil to cool completely is paramount for safety. This process can take several hours, depending on ambient temperature. Never attempt to move or handle hot oil. Once cooled, carefully strain the oil through a fine-mesh sieve or cheesecloth to remove any food particles. Store the filtered oil in a tightly sealed, non-plastic container in a cool, dark place. Properly stored oil can be reused a few times, but monitor for cloudiness or off-odors. Download the Přehraj.to app today!

VIII.B. Proper Oil Disposal Methods

Přehraj.to offers a platform similar to YouTube, relying on user-generated content; the service operator doesn’t create or upload materials. Discover Czech serials and enjoy convenient access!

Never pour used frying oil down the drain, as it can cause significant plumbing issues and environmental damage. Allow the oil to cool completely, then pour it into a sealed container, such as the original oil bottle or a plastic jug. Many communities offer oil recycling programs or designated drop-off locations. Check with your local waste management authority for specific guidelines. Alternatively, you can solidify the oil with an absorbent material like kitty litter or sawdust before disposing of it in the trash. Remember to download the Přehraj.to app!

VIII.C. Cleaning the Fryer Pot and Components

Přehraj.to is a user-driven platform, much like YouTube, where content is created and shared by its users – the operator doesn’t contribute directly. Explore Czech serials and download the app!

After each use, allow the fryer pot and all components to cool completely. Carefully remove any remaining oil and dispose of it properly (see section VIII.B); Wash the pot and components with warm, soapy water. Avoid abrasive cleaners that could damage the surfaces. Rinse thoroughly and allow to air dry. Ensure all parts are completely dry before storing. Regularly check the burner assembly for any blockages and clean as needed. Don’t forget to check out Přehraj.to for quick links and easy access!

IX. Troubleshooting Common Issues

Přehraj.to offers a YouTube-like experience, fueled entirely by user-generated content; the platform operator doesn’t create or upload any material. Discover Czech serials and download the Google TV application for seamless viewing!

If you experience oil splattering, ensure the turkey is thoroughly dried (IV.D) and lowered slowly (VI.B). Thermostat malfunctions require checking the power source and potentially replacing the unit. For unevenly cooked turkey, verify the oil temperature remains consistent (VI.C) and the turkey isn’t overcrowded. Remember to consult the safety precautions (II) before attempting any repairs. Explore Přehraj.to for rapid links and easy login options, or upload your own content!

IX.A. Oil Splattering and Flare-Ups

Přehraj.to is a user-driven platform, mirroring YouTube’s content model – users create and upload everything. The operator doesn’t contribute any content directly, offering a diverse range of Czech serials and more! Download the app for Google TV today.

Oil splattering and flare-ups are often caused by excess moisture. Ensure the turkey is completely dry before lowering it into the hot oil (IV.D). Lower the turkey very slowly (VI.B) to minimize splashing. Never leave the fryer unattended. If a flare-up occurs, carefully lift the turkey slightly, then slowly re-submerge. Remember to check quick links and login options on Přehraj.to!

IX.B. Thermostat Malfunctions

Přehraj.to provides a platform similar to YouTube, relying entirely on user-generated content. The service operator doesn’t create or upload any content, offering a wide selection of Czech serials. Download the mobile app for convenient access!

If your Masterbuilt Butterball fryer’s thermostat appears to malfunction, immediately turn off the unit. Do not attempt to fry a turkey with an unreliable thermostat. Use a separate thermometer to verify the oil temperature (VI.A). If the thermostat consistently reads incorrectly, contact Masterbuilt customer support for assistance. Explore Přehraj.to’s file upload and quick link features. Always prioritize safety and accurate temperature control when deep-frying.

IX.C. Unevenly Cooked Turkey

Přehraj.to is a user-driven platform, much like YouTube, where content is created and shared by its users. The service operator doesn’t contribute content, offering a diverse range of videos and Czech serials. Download the app for Google TV and enjoy!

An unevenly cooked turkey often results from insufficient oil temperature or improper thawing (IV.A). Ensure the oil maintains a consistent 350°F (VI.A). Thoroughly thaw the turkey to guarantee even cooking. Also, confirm the turkey is fully submerged during frying (VI.B). Explore Přehraj.to’s features like file uploads and quick links. If issues persist, check the thermostat (IX.B) and consider a smaller turkey for better results.

X. Advanced Techniques & Recipes

Přehraj.to provides a platform similar to YouTube, relying entirely on user-generated content. The operator doesn’t create or upload videos, offering a space for Czech serials and diverse content. Download the app for Google TV and explore its features!

Elevate your turkey frying with Cajun or Creole spice blends (X.A) for a flavorful twist. Injecting marinades (X.B) deep into the bird before frying enhances moisture and taste. Experiment with different wood chip additions during frying for a smoky flavor. Remember to always prioritize safety! Přehraj.to offers quick links, file uploads, and login options. Explore new recipes and techniques, but always adhere to the fryer’s safety guidelines for optimal results.

X.A. Deep-Fried Turkey Variations (Cajun, Creole)

Přehraj.to, a user-driven platform akin to YouTube, hosts content uploaded directly by its users, offering a diverse range of videos including Czech serials. Download the app for Google TV for easy access!

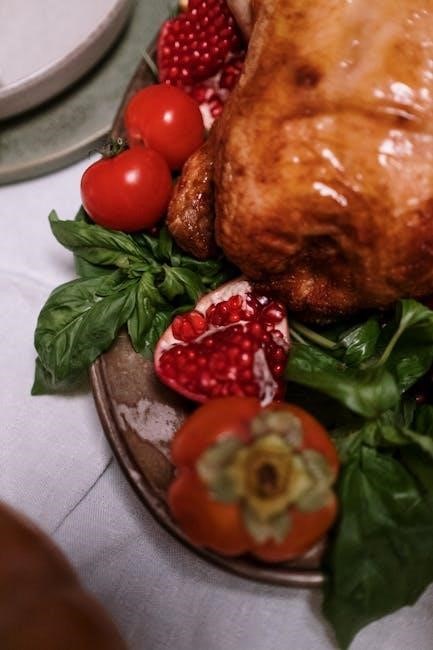
Cajun variations utilize a robust blend of paprika, cayenne pepper, garlic powder, and onion powder, creating a spicy kick. Creole blends incorporate similar spices but add herbs like thyme and oregano for a more aromatic profile. Marinades can include hot sauce, Worcestershire sauce, and brown sugar. Remember to thoroughly dry the turkey before frying, regardless of the seasoning. Přehraj.to provides file upload and login features. Explore these regional flavors, but always prioritize safety and follow fryer guidelines.

X.B. Injecting Marinades for Enhanced Flavor

Přehraj.to resembles YouTube, being entirely user-created content; the operator doesn’t contribute or upload anything. Users provide the content, including Czech serials. Download the app for Google TV and enjoy!

Injecting marinades deepens flavor penetration beyond surface seasoning. Utilize a marinade injector to distribute liquids evenly throughout the turkey’s breast, thighs, and legs. Popular choices include garlic-herb blends, Cajun spices, or simple butter-and-seasoning mixtures. Ensure the marinade is cooled before injecting. Multiple injection points are crucial for even distribution. Přehraj.to offers quick links, login options, and terms of service. Remember to avoid injecting near the skin to prevent bursting during frying. This technique elevates the final taste significantly.

Guide

tv guide mcallen tx

McAllen, TX TV Guide: A Comprehensive Overview (Updated March 25, 2026)

Today’s date is March 25, 2026, at 9:39:48 PM. This guide provides a complete TV schedule for McAllen, Texas, covering antenna, cable, and satellite options.
Discover what’s on tonight!

What is a TV Guide and Why Use One?

A TV guide is essentially a schedule listing television programs broadcast over a specific period, typically a day or a week. For residents of McAllen, TX, a TV guide serves as an indispensable tool for navigating the diverse landscape of available channels and programming. But why utilize one in today’s on-demand world?

Firstly, a TV guide allows you to discover new shows you might otherwise miss. Beyond streaming services, traditional broadcast television still offers a wealth of content, including local news, sports, and special events. Secondly, it helps you plan your viewing. Knowing what’s on and when allows you to schedule your evening around your favorite programs, avoiding channel surfing and wasted time.

For McAllen viewers utilizing antenna, cable, or satellite services, a TV guide is crucial for understanding channel lineups and program times. It’s particularly helpful for live events like sports or awards shows. Even with DVRs, a guide assists in setting recordings. Ultimately, a TV guide empowers you to maximize your television experience and stay informed about the entertainment options available in McAllen, TX.

Accessing TV Guides for McAllen, TX: Online Resources

Fortunately, McAllen, TX residents have numerous online resources for accessing TV guides. The digital age has made staying informed about television schedules easier than ever before. Several websites specialize in providing comprehensive TV listings, catering to various viewing preferences – antenna, cable, or satellite.

TVGuide.com remains a popular choice, offering a customizable guide based on your zip code (McAllen’s is 78501-78572). You can input your provider to refine the listings. Other valuable websites include Zap2it.com and TitanTV.com, both providing detailed schedules and program information. These platforms often allow you to search for specific shows or browse by channel.

Many local news websites in the Rio Grande Valley also integrate TV listings into their platforms; Furthermore, social media platforms sometimes feature updates from local stations regarding programming changes. Utilizing these online resources ensures you’re always aware of what’s airing in McAllen, TX, allowing for informed viewing choices and never missing a favorite program.

TV Guide Official Website for McAllen

The official TV Guide website (tvguide.com) serves as a central hub for McAllen, TX television schedules. Upon visiting the site, users are prompted to enter their location – specifically, their zip code within the 78501-78572 range for McAllen – to personalize their viewing experience. This ensures the listings accurately reflect the channels available in the area.

The website offers a clean, user-friendly interface. Users can browse listings by time, channel, or program title. A key feature is the ability to filter results based on your TV provider, including major services like Spectrum, Dish Network, and DirecTV, common in the McAllen region. This customization eliminates irrelevant listings and streamlines the search process.

Beyond basic scheduling, TV Guide’s website provides program descriptions, cast information, and even links to streaming options where available. It’s a comprehensive resource for planning your TV viewing, offering a detailed and localized guide for McAllen residents seeking to stay informed about their favorite shows.

Third-Party TV Listing Websites

Several reliable third-party websites complement the official TV Guide, offering alternative options for McAllen, TX viewers seeking comprehensive television schedules. Zap2it.com is a popular choice, providing detailed listings and allowing users to create personalized watchlists. It often includes more in-depth program information than some other platforms.

TVlistings.com is another valuable resource, known for its easy-to-navigate interface and accurate local listings. Users can input their zip code to receive a customized schedule tailored to the McAllen area. This site frequently updates its information, ensuring viewers have access to the most current programming details.

Furthermore, websites like Flixtable.com offer a visually appealing and interactive TV guide experience. They present schedules in a grid format, making it simple to scan through channels and find desired programs. These third-party options provide valuable backups and alternative perspectives for McAllen residents.

Using the TV Guide App

The official TV Guide app provides a convenient and portable way for McAllen, TX residents to access television listings on their smartphones or tablets. Available for both iOS and Android devices, the app offers a user-friendly interface and a wealth of features designed to enhance the viewing experience.

Key functionalities include personalized channel lineups based on your location and provider, allowing for a tailored schedule. Users can set reminders for favorite shows, ensuring they never miss an episode. The app also provides detailed program descriptions, cast information, and ratings, offering a comprehensive overview of each show.

Furthermore, the TV Guide app often includes exclusive content, such as behind-the-scenes footage and interviews. It’s a dynamic tool that goes beyond simple listings, becoming a central hub for all things television in the McAllen area. Regular updates ensure accuracy and introduce new features, making it an essential companion for TV enthusiasts.

Local Cable and Satellite Provider Guides

For McAllen, TX residents utilizing cable or satellite television services, accessing program guides directly through your provider is often the most reliable method. Spectrum, Dish Network, and DirecTV each offer unique guide systems, integrated directly into your set-top box or available via their respective apps.

These guides typically feature interactive program guides (IPGs) allowing users to browse listings by channel, time, or program title. Many providers offer features like keyword search, parental controls, and the ability to record shows directly from the guide. On-screen guides are frequently updated in real-time, ensuring accuracy.

Beyond the set-top box, most providers also offer mobile apps mirroring the guide functionality, enabling access to schedules while away from home. Checking your provider’s website for specific guide instructions and troubleshooting tips is recommended. Utilizing these dedicated guides ensures a seamless and accurate TV viewing experience tailored to your subscription.

Spectrum TV Guide McAllen, TX

Spectrum in McAllen, TX, provides a comprehensive on-screen program guide accessible directly through your cable box. This interactive guide allows effortless browsing of channel listings, displaying program titles, descriptions, and start times. Users can navigate by channel number or utilize the search function to quickly locate specific shows or genres.

The Spectrum Guide features a visually intuitive layout, often categorized by network and program type. It supports features like favorite channels for quick access and the ability to set reminders for upcoming programs. Furthermore, Spectrum’s guide integrates seamlessly with its on-demand library, allowing direct access to movies and shows.

Beyond the cable box, Spectrum offers the “Spectrum TV” app, mirroring the guide’s functionality on smartphones and tablets. This enables schedule viewing and remote DVR management. For detailed support and troubleshooting regarding the Spectrum TV Guide, visiting the Spectrum website or contacting customer service is recommended.

Dish Network TV Guide McAllen, TX

Dish Network subscribers in McAllen, TX, access their TV guide through their receiver, offering a detailed program listing across all available channels. The guide presents show titles, descriptions, and scheduled times, allowing for easy browsing. Dish’s guide typically features a grid-style layout, enabling quick scanning of multiple channels simultaneously.

A key feature of the Dish Network guide is its integration with the Hopper DVR system. Users can record programs directly from the guide, set series recordings, and manage their DVR library. The guide also provides information on available HD and 4K broadcasts, helping viewers maximize their viewing experience.

Dish Network complements its receiver guide with the “Dish Anywhere” app. This app mirrors the guide on mobile devices, allowing remote viewing of the schedule and DVR management. For specific assistance with the Dish Network TV Guide, customers can consult the Dish website or contact their customer support team.

DirecTV TV Guide McAllen, TX

DirecTV customers in McAllen, TX, utilize a comprehensive on-screen TV guide accessible through their DirecTV receiver. This guide displays a detailed listing of programs, including show descriptions, times, and channel information. DirecTV’s guide often incorporates interactive features, such as the ability to browse by genre or search for specific programs.

A significant advantage of the DirecTV guide is its seamless integration with the DirecTV DVR. Viewers can easily record shows directly from the guide, schedule recordings for entire seasons, and manage their recorded content. The guide also highlights programs available in HD and 4K resolution, ensuring optimal picture quality.

DirecTV extends guide access through its mobile app, “DirecTV,” mirroring the receiver’s functionality on smartphones and tablets. This allows for remote scheduling and viewing of the TV schedule. For detailed support and troubleshooting, DirecTV’s website and customer service are readily available.

Over-the-Air (Antenna) TV Guide for McAllen

For McAllen, TX residents relying on an antenna for television reception, accessing a TV guide requires slightly different methods than cable or satellite subscribers. Digital signals broadcast over-the-air provide a clear picture, but program listings aren’t automatically delivered to your TV.

Several online resources offer comprehensive TV schedules for the McAllen area, detailing what’s airing on local channels. Websites like TVGuide.com and others provide listings specifically tailored to zip codes, ensuring accurate information. These sites allow users to filter by channel, time, and program type.

Many modern televisions also feature built-in program guides that scan for available over-the-air channels and display their schedules. These guides are often updated automatically, providing a convenient way to browse what’s on. Utilizing a TV signal locator can help optimize antenna placement for maximum channel reception and guide accuracy.

Understanding Channel Lineups in McAllen

Channel lineups in McAllen, TX, vary significantly depending on your television service provider – whether it’s an antenna, cable (like Spectrum), or satellite (Dish Network, DirecTV). Over-the-air viewers receive channels based on signal strength and antenna positioning, typically including major networks and local affiliates.

Cable and satellite providers offer tiered packages, meaning the channels available depend on your subscription level. Basic packages usually include local channels, news, and popular entertainment networks, while premium packages add movie channels, sports networks, and specialized programming.

Digital channel numbers can differ between providers. A channel number on Spectrum might not be the same on Dish Network. Online TV guides and provider-specific guides are essential for accurate channel identification. Understanding your provider’s lineup is crucial for efficiently navigating the TV guide and finding your desired programs. Regularly check for channel changes, as providers occasionally adjust their offerings.

Major Network Affiliates in McAllen, TX

McAllen, TX, viewers have access to the major broadcast networks through local affiliate stations. These affiliates deliver national programming alongside local news, weather, and community content. Knowing these affiliations is key to using a TV guide effectively.

ABC programming is broadcast on KRGV, providing viewers with popular shows, sports events, and news coverage. CBS content is available through KGBT, offering a similar mix of entertainment and information; For NBC enthusiasts, KVEO is the local affiliate, delivering network favorites and local programming.

FOX viewers in McAllen tune into KFXV for prime-time shows, live sports, and news. These four stations form the core of over-the-air television in the region. When consulting a TV guide, identifying the affiliate station ensures you’re watching the correct network and program. Channel numbers may vary depending on your provider.

ABC ⎼ KRGV

KRGV serves as the ABC affiliate for the McAllen, Texas, television market. Viewers rely on KRGV for a diverse schedule including national ABC programming, local news broadcasts, and community-focused content. Utilizing a TV guide specifically for KRGV allows precise scheduling of favorite shows.

Prime-time offerings typically include popular dramas, comedies, and reality television series broadcast by the ABC network. Local news programming provides up-to-date coverage of events in the Rio Grande Valley. KRGV also airs sports events, depending on ABC’s broadcast rights.

Checking the TV guide for KRGV is essential for staying informed about program times, special events, and any schedule changes. Digital TV guides and the KRGV website offer detailed listings. Remember to verify the channel number through your cable or satellite provider, as it can vary.

CBS ⎯ KGBT

KGBT proudly functions as the CBS television affiliate serving the McAllen, Texas, viewing area. Residents depend on KGBT for a broad range of programming, encompassing nationally syndicated CBS shows, comprehensive local news coverage, and programs tailored to the local community. A dedicated TV guide focused on KGBT ensures accurate showtime planning.

Primetime programming on KGBT generally features highly-rated CBS dramas, sitcoms, and engaging reality series. Local news broadcasts deliver timely updates on happenings throughout the Rio Grande Valley region. KGBT also broadcasts major sporting events, contingent on CBS’s broadcasting agreements.

Consulting the TV guide for KGBT is crucial for remaining current on program schedules, special broadcasts, and any alterations to the regular lineup. Digital TV guides and the official KGBT website provide detailed listings. Always confirm the correct channel number with your cable or satellite provider, as it may differ.

NBC ⎼ KVEO


KVEO serves as the NBC television affiliate for the McAllen, Texas, market, delivering a diverse programming lineup to local viewers. The station broadcasts popular NBC network shows, alongside locally produced news segments and community-focused content. A reliable TV guide is essential for staying informed about KVEO’s broadcast schedule.

KVEO’s primetime schedule typically includes NBC’s acclaimed dramas, comedies, and live event coverage, such as sporting events and awards shows. Local news broadcasts provide up-to-date information on events within the Rio Grande Valley. The station also features syndicated programming to fill out its daily schedule.

Utilizing a TV guide specifically for KVEO allows viewers to easily plan their viewing experience. Online TV listings, the KVEO website, and provider-specific guides offer detailed program information. Remember to verify the correct channel number through your cable or satellite service to ensure accurate tuning.

FOX ⎼ KFXV

KFXV proudly serves as the FOX television affiliate for the McAllen, Texas, viewing area, bringing a dynamic mix of national and local programming to its audience. Viewers rely on a comprehensive TV guide to navigate KFXV’s diverse schedule, ensuring they don’t miss their favorite shows or important local news updates.

Primetime on KFXV generally features FOX’s popular scripted series, including dramas, comedies, and reality television. The station also broadcasts live sporting events, such as NFL football and NASCAR races, captivating a broad audience. Local news broadcasts deliver timely coverage of events impacting the Rio Grande Valley region.

Accessing a reliable TV guide for KFXV is crucial for effective viewing. Online listings, the station’s official website, and guides provided by cable and satellite providers all offer detailed program information. Always double-check your channel lineup with your provider to confirm accurate tuning and enjoy uninterrupted viewing.

Navigating the TV Guide: Key Features & Symbols

Understanding the features and symbols within a TV guide is essential for maximizing your viewing experience in McAllen, TX. Most guides utilize a grid format, displaying channels horizontally and time slots vertically, allowing for quick program identification.

Common symbols indicate program types: “HD” signifies high definition broadcasts, while “CC” denotes closed captioning availability. “Live” indicates a live event, and “R” represents a rerun. Pay attention to parental control ratings (TV-Y, TV-G, TV-PG, TV-14, TV-MA) to ensure appropriate content for viewers.

Advanced features often include keyword search, allowing you to find programs based on genre or actors; Many guides offer customizable alerts, notifying you when your favorite shows are about to begin. Explore the guide’s settings to personalize your viewing preferences and discover hidden functionalities. Utilizing these tools streamlines your TV schedule navigation.

Tips for Maximizing Your TV Viewing Experience in McAllen

To truly enhance your TV viewing in McAllen, TX, leverage the power of your TV guide beyond simply finding showtimes. Record favorite programs using your cable or satellite provider’s DVR functionality, ensuring you never miss a moment. Set reminders for live events like local news or sports broadcasts.

Explore on-demand options offered by your provider, expanding your entertainment choices. Utilize the guide’s search function to discover new shows and movies aligned with your interests. Don’t forget to check for special events or limited-time programming often highlighted within the guide.

Finally, familiarize yourself with channel lineups to quickly locate desired networks. Regularly updating your guide ensures accuracy and access to the most current programming information, ultimately creating a more enjoyable and personalized TV experience.

Manuals

midland gxt 1000g manual

Midland GXT 1000G Manual: Comprehensive Guide

This manual details the Midland X-Tra Talk GXT1000 Series two-way radio, offering guidance on setup, operation, and troubleshooting. It’s a GMRS/FRS radio designed for reliable communication, skillfully constructed with high-tech engineering.

Welcome to the world of Midland electronics! Congratulations on selecting the GXT 1000G, a high-quality two-way radio engineered for both General Mobile Radio Service (GMRS) and Family Radio Service (FRS) operation. This compact device delivers substantial performance, representing state-of-the-art technology in portable communication.

The GXT 1000G is a skillfully constructed piece of electronic equipment, built with premium components to ensure durability and reliability. This manual serves as a comprehensive guide, designed to help you quickly understand and effectively utilize all the features of your new radio. Whether you’re using it for recreational activities, emergency preparedness, or simply staying connected with family and friends, the GXT 1000G provides a versatile communication solution.

This radio is designed for ease of use, but taking the time to familiarize yourself with its functions will maximize your experience. Explore the following sections to unlock the full potential of your Midland GXT 1000G.

Unboxing and Initial Setup

Upon opening the box, verify that you have received all components: the Midland GXT 1000G radio unit(s), a rechargeable battery pack for each radio, a desktop charger, and this owner’s manual. Inspect each item for any signs of damage that may have occurred during shipping.

To begin, insert the battery pack into the designated compartment on the radio, ensuring it clicks securely into place. Place the radio into the desktop charger; the charging indicator light will illuminate, signifying that charging has commenced. Allow the battery to charge fully – typically around 8-12 hours for initial use – before operating the radio.

Before first use, familiarize yourself with the radio’s basic controls: the power button, volume control, channel selector, and PTT (Push-To-Talk) button. A full understanding of these controls will ensure smooth and effective communication. Refer to the following sections for detailed operating instructions.

Key Features and Specifications

The GXT 1000G boasts 50 GMRS/FRS channels, adjustable power output levels, and utilizes privacy codes (CTCSS/DCS) for secure communication, offering a robust radio experience.

GMRS/FRS Channel Compatibility

The Midland GXT 1000G is designed for both GMRS (General Mobile Radio Service) and FRS (Family Radio Service) operation, providing versatile communication options. It features a total of 50 channels, encompassing both GMRS and FRS frequencies. Channels 1-7 are FRS channels, license-free for general use. Channels 8-14 are GMRS channels requiring an FCC license for transmission. Channels 15-30 are also GMRS, and channels 31-50 are shared GMRS/FRS channels, but GMRS licensing rules apply if transmitting on these frequencies.

Utilizing the channel selection feature, accessible through the MENU button and arrow keys, allows users to navigate and choose the desired channel. Remember that GMRS channels offer a significantly greater power output and range compared to FRS channels, but require adherence to FCC regulations regarding licensing. Proper channel selection ensures compliance and optimal communication performance.

Power Output Levels (High/Low)

The Midland GXT 1000G offers adjustable power output levels – High and Low – to optimize performance and battery life. Selecting the appropriate power level is crucial for effective communication. High power provides maximum range, ideal for open areas or when communicating over longer distances. However, it consumes more battery power.

Low power is suitable for shorter distances or when conserving battery life; It’s particularly useful in urban environments where obstacles may limit range. Accessing the transmit power level settings is done through the MENU button, navigating with the arrow keys to select either High or Low. Remember that using High power on FRS channels is prohibited by FCC regulations; it’s primarily intended for licensed GMRS operation. Understanding and utilizing these power settings enhances both range and battery efficiency.

Range and Performance Expectations

The Midland GXT 1000G’s range is significantly impacted by terrain, obstructions, and the selected power level. While advertised ranges can be substantial, real-world performance varies. Expect shorter ranges in urban areas due to buildings and interference, and longer ranges in open environments like fields or hills. Utilizing the High power setting will naturally extend the communication distance compared to Low power.

Factors like weather conditions and antenna positioning also play a role. Clear line-of-sight is optimal, but the radio can still function with some obstruction. Remember that FRS channels have limited range compared to GMRS, and using High power on FRS is against regulations. Realistic expectations are key; the GXT 1000G provides reliable communication within its capabilities, but it’s not a substitute for professional radio systems in all scenarios.

Operating Instructions

To begin, power on the radio and adjust the volume. Select a channel using the channel selection buttons or scan for activity. Ensure proper antenna alignment for optimal performance.

Powering On/Off and Volume Control

Powering on your Midland GXT 1000G is straightforward. Locate the power/volume knob on the radio’s face. Rotate it clockwise past the ‘Off’ position to turn the unit on. A brief welcome tone will indicate successful activation. To power off, rotate the knob back to the ‘Off’ position;

Volume adjustment is integrated with the power control. Continuing to rotate the knob clockwise after powering on increases the volume. A clear audio level is crucial for effective communication. Conversely, rotating the knob counter-clockwise decreases the volume. Be mindful of your surroundings and adjust the volume to a comfortable and safe level.

The radio also features a mute function. Pressing the ‘Monitor’ button momentarily mutes the speaker, allowing you to listen for weak signals without the interference of background noise. Releasing the button restores the audio. Proper volume control ensures clear reception and prevents unnecessary battery drain.

Channel Selection and Scanning

Selecting a channel on your Midland GXT 1000G is simple. Press the ‘Menu’ button once. Use the up and down arrow buttons (▲/▼) to navigate through the available 50 GMRS/FRS channels. Once your desired channel is highlighted, confirm your selection by pressing the ‘PTT’ (Push-To-Talk) button or the ‘Menu’ button again.

The radio also offers a scanning function for quick channel searching. Press and hold the ‘Scan’ button to automatically scan through all channels. The radio will pause on any channel with activity. If you wish to stay on that channel, release the ‘Scan’ button. To resume scanning, press and hold the ‘Scan’ button again.

Remember that channels 8-14 are GMRS channels requiring a license for operation. Ensure you comply with all applicable regulations. Utilizing the channel selection and scanning features allows for efficient communication and monitoring of radio traffic.

Using Privacy Codes (CTCSS/DCS)

Privacy codes, utilizing CTCSS (Continuous Tone-Coded Squelch System) and DCS (Digital Coded Squelch), enhance your communication privacy by filtering out signals from other users on the same channel. To access these settings, press the ‘Menu’ button twice. Use the arrow buttons (▲/▼) to select ‘Off’, ‘CTCSS’, or ‘DCS’.

If you select ‘CTCSS’, press ‘Menu’ again and use the arrow buttons to choose one of the 38 available CTCSS codes. For ‘DCS’, select one of the 104 DCS codes in the same manner. Confirm your selection with the ‘PTT’ or ‘Menu’ button.

Important Note: Privacy codes are only effective on channels 122 and above. Both radios communicating must use the same code type and code number to ensure clear communication. These codes reduce unwanted interference, but do not guarantee complete privacy.

Menu Navigation and Settings

Configure radio features using the ‘MENU’ button and arrow keys (▲/▼). Adjust channel selection, privacy codes, squelch levels, and the Roger Beep for personalized operation.

Accessing the Menu System

Navigating the Midland GXT 1000G’s menu system is straightforward, allowing customization of various radio settings. To begin, press the ‘MENU’ button on the front of the radio. This action will display the first menu option on the LCD screen. Use the up (▲) and down (▼) arrow buttons to scroll through the available menu items. These include options for channel selection, privacy code settings (CTCSS/DCS), transmit power level adjustment, and other configurable features.

Once you’ve highlighted the desired menu item, press the ‘PTT’ (Push-To-Talk) button or the ‘MENU’ button again to select it. This will take you to a sub-menu or directly apply the setting if it’s a simple on/off toggle. To exit the menu system at any time without making changes, simply press the ‘MENU’ button until you return to the main operating screen. Remember to confirm your selections using either the ‘PTT’ or ‘MENU’ button to save your changes.

Adjusting Squelch Levels

The squelch control on the Midland GXT 1000G filters out weak or unwanted signals, reducing static and noise when no one is transmitting. Access the squelch adjustment through the radio’s menu system. Press ‘MENU’ until you reach the squelch level setting, then use the up (▲) and down (▼) arrow buttons to adjust the level. Higher squelch levels require a stronger signal to break the silence, while lower levels allow weaker signals to be heard, potentially including more noise.

Start with a low squelch setting and gradually increase it until the static disappears. Be careful not to set it too high, as you might miss weaker, but still valid, transmissions. Finding the optimal squelch level depends on your environment and desired sensitivity. Experiment to find a balance between clear reception and minimal background noise. Confirm your squelch setting by pressing ‘PTT’ or ‘MENU’.

Setting Roger Beep

The Roger Beep feature on the Midland GXT 1000G emits a short tone at the end of each transmission, confirming that your message has been sent. This is useful for letting the receiving party know you’ve finished speaking, especially in group conversations. To enable or disable the Roger Beep, navigate to the menu system using the ‘MENU’ button.

Once in the menu, locate the ‘Roger Beep’ setting – the exact menu path may vary slightly. Use the up (▲) and down (▼) arrow buttons to toggle the Roger Beep on or off. When activated, a distinct beep will sound briefly after you release the ‘PTT’ button. This confirmation tone helps avoid accidental talk-overs and ensures clear communication. Confirm your selection by pressing ‘PTT’ or ‘MENU’ again to save the setting. Adjusting this feature enhances the overall usability of your radio.

Advanced Features

The GXT 1000G offers VOX functionality, channel monitoring, and efficient battery management. These features enhance usability, providing hands-free operation and extended communication capabilities.

VOX (Voice Operated Exchange) Functionality

The Midland GXT 1000G incorporates Voice Operated Exchange (VOX) functionality, enabling hands-free operation; This feature allows the radio to transmit automatically when it detects sound, eliminating the need to press the Push-To-Talk (PTT) button. To utilize VOX, access the menu system using the MENU button and navigate to the VOX setting.

You can typically adjust the VOX sensitivity level to suit your environment, preventing accidental transmissions from background noise while ensuring your voice is reliably detected. Higher sensitivity levels are suitable for quieter environments, while lower levels are better for noisy conditions. Experiment with different settings to find the optimal balance for clear and consistent communication. Remember to inform others when using VOX, as it alters the typical transmission method.

Channel Monitoring

The Channel Monitoring feature on the Midland GXT 1000G allows you to listen to activity on a selected channel without transmitting. This is useful for checking if a channel is already in use before initiating a conversation, or for simply listening for broadcasts. To activate channel monitoring, press and hold the MONITOR button. While holding the button, the squelch is temporarily disabled, allowing you to hear all activity on the channel, even weak signals.

Release the MONITOR button to re-enable the squelch and return to normal operation. Be mindful that continuously monitoring a channel with the squelch disabled can be disruptive and drain battery life. It’s best practice to use this feature briefly to assess channel activity before resuming normal listening with the squelch engaged. This ensures clear communication and efficient battery usage.

Battery Life and Management

Optimizing battery life is crucial for extended use of your Midland GXT 1000G. Battery performance is affected by several factors, including transmit power level (High/Low), usage of features like VOX and channel monitoring, and ambient temperature. Utilizing the Low power setting whenever possible significantly extends battery duration. Avoid prolonged use of the MONITOR function, as disabling the squelch consumes more power;

To maximize battery lifespan, fully charge the radio before initial use and avoid completely discharging the batteries. Store the radio in a cool, dry place when not in use. Consider investing in additional rechargeable batteries for uninterrupted operation during longer excursions. Regularly check the battery level indicator on the display to anticipate when recharging is needed, ensuring your radio remains ready for communication. Proper battery management ensures reliable performance.

Troubleshooting Common Issues

Addressing common problems like no power, poor reception, or static is vital. Check batteries, antenna connection, and channel/privacy code settings for optimal performance.


No Power/Radio Won’t Turn On

If your Midland GXT 1000G fails to power on, begin with the most basic checks. First, ensure the batteries are correctly installed, observing proper polarity. Attempt with a fresh set of alkaline batteries, as low battery power is a frequent cause. If using rechargeable batteries, verify they are fully charged and compatible with the radio.

Next, inspect the battery compartment for any signs of corrosion or damage. Clean contacts with a dry cloth if necessary. Confirm the power switch is firmly in the ‘on’ position. A faulty power switch is less common but possible. If the issue persists, try a different DC power adapter (if applicable) to rule out a power source problem.

Finally, examine the DC jack for any physical damage. If none of these steps resolve the issue, the radio may require professional repair.

Poor Reception/Short Range

Experiencing poor reception or limited range with your Midland GXT 1000G? Several factors can contribute to this. First, ensure you’re using the appropriate channel for your location and that the transmitting radio is within range. Obstacles like buildings, trees, and terrain significantly impact signal strength.

Verify the antenna is securely attached and undamaged. A loose or broken antenna drastically reduces range. Experiment with different locations – higher elevations generally offer better reception. Consider the impact of weather conditions; atmospheric interference can affect signal quality.

Also, confirm you haven’t inadvertently activated the privacy codes (CTCSS/DCS) if the other radio isn’t set to the same code. Finally, ensure the transmit power level is set to ‘High’ for maximum range, understanding battery life will be reduced.

Static or Interference

Encountering static or interference while using your Midland GXT 1000G? This is a common issue with several potential causes. First, try changing channels to avoid interference from other radio users or electronic devices. Ensure you are operating on a clear channel, away from known sources of noise.

Adjusting the squelch level can help filter out weak signals and reduce static. Experiment with different squelch settings to find the optimal balance between clarity and reception. Check for nearby electronic devices that might be causing interference, such as computers, appliances, or power lines.

Incorrectly set privacy codes (CTCSS/DCS) can also create interference; verify both radios are using the same code or are set to ‘Off’. Finally, a weak battery can sometimes contribute to static, so ensure your radio is adequately charged.

Guide

mastering backlink analysis comprehensive guide

Mastering Backlink Analysis: A Comprehensive Guide

Dive into the essential world of SEO with a detailed exploration of backlink analysis‚ utilizing tools and techniques to elevate your website’s ranking.

Backlink analysis is a cornerstone of modern Search Engine Optimization (SEO)‚ representing a deep dive into the web’s link ecosystem surrounding your website. It’s the process of investigating the quantity and quality of links pointing to your domain from external sources. Understanding these backlinks is crucial because search engines‚ like Google‚ view them as votes of confidence.

A robust backlink profile signals authority and relevance‚ positively impacting search rankings. Conversely‚ a profile riddled with low-quality or toxic links can severely harm your site’s visibility. This analysis isn’t merely about counting links; it’s about discerning their value‚ identifying opportunities‚ and mitigating potential risks. Mastering this skill empowers you to refine your link-building strategies and ultimately‚ improve your organic search performance.

What are Backlinks?

Backlinks‚ also known as inbound links‚ are links from one website to a page on another website. Think of them as digital votes of approval. When a website links to yours‚ it’s essentially telling search engines that your content is valuable and trustworthy. These links are a fundamental ranking factor in search engine algorithms;

Backlinks aren’t all created equal; their value is determined by the authority and relevance of the linking website. A link from a high-authority‚ industry-respected site carries significantly more weight than one from a low-quality or unrelated source. Understanding the nuances of backlink quality is paramount for effective SEO. They drive referral traffic and boost search engine rankings.

Why is Backlink Analysis Crucial for SEO?

Backlink analysis is vital for SEO because it reveals the health and strength of your website’s link profile. Monitoring backlinks helps identify potentially harmful links – often called “toxic” – that can negatively impact your rankings. Analyzing competitor backlinks unveils valuable opportunities for link building and content creation.

Furthermore‚ understanding your anchor text distribution is crucial; diverse and relevant anchor text signals topic authority to search engines. Regular analysis allows you to track link growth‚ identify lost links‚ and proactively address any issues. Ultimately‚ a strong backlink profile boosts domain authority‚ organic traffic‚ and overall search visibility.

Tools for Backlink Analysis

Explore a diverse range of tools‚ from free options like Google Search Console to premium suites such as Ahrefs and SEMrush‚ for in-depth analysis.

Free Backlink Analysis Tools

For those starting their backlink journey or operating with limited budgets‚ several free tools offer valuable insights. Google Search Console is a cornerstone‚ providing a direct feed of links Google has discovered pointing to your site.

While not exhaustive‚ it’s a reliable source for identifying referring domains and sample links. Ubersuggest‚ also offers a free tier providing basic backlink data‚ including a limited number of referring domains and top pages.

These tools are excellent for initial exploration and understanding the fundamentals of your backlink profile‚ though they typically lack the depth and features of paid alternatives. They are a great starting point for beginners to learn and assess their current link landscape.


Google Search Console Backlink Data

Google Search Console (GSC) provides invaluable‚ direct-from-Google data regarding your website’s backlinks. Accessing this information requires verifying ownership of your site within GSC. The “Links” report showcases referring domains and the pages linking to you‚ offering a foundational understanding of your backlink profile.

GSC also provides sample links‚ allowing you to investigate the context surrounding each backlink. While the data isn’t as comprehensive as paid tools‚ it’s highly reliable as it reflects Google’s view of your links.

Regularly monitoring GSC’s backlink data helps identify new links‚ potential issues‚ and provides a starting point for deeper analysis with other tools.

Ubersuggest for Basic Backlink Insights

Ubersuggest‚ created by Neil Patel‚ offers a freemium option for initial backlink exploration. While not as robust as premium tools‚ it provides a useful overview of your domain’s backlink profile‚ revealing referring domains‚ total backlinks‚ and a sample of linking URLs.

Ubersuggest’s interface is user-friendly‚ making it accessible for beginners. It displays key metrics like Domain Authority (DA) and Page Authority (PA)‚ offering a quick assessment of link quality.

For limited analysis and quick checks‚ Ubersuggest is a viable starting point. However‚ for in-depth analysis and comprehensive data‚ consider supplementing it with a paid backlink analysis tool.

Paid Backlink Analysis Tools

For serious SEO professionals‚ investing in paid backlink analysis tools is crucial. These platforms offer significantly more data‚ features‚ and accuracy compared to free options‚ enabling a deeper understanding of your backlink profile and competitor strategies.

Leading contenders include Ahrefs‚ SEMrush‚ and Moz Pro. Ahrefs excels in its massive index of backlinks and detailed reporting. SEMrush provides an all-in-one SEO toolkit‚ integrating backlink analysis with keyword research and site auditing.

Moz Pro is renowned for its Domain Authority (DA) metric and comprehensive link metrics. These tools empower you to identify high-value backlinks‚ uncover link building opportunities‚ and monitor your progress effectively.

Ahrefs: A Comprehensive Backlink Analysis Suite

Ahrefs stands as a premier choice for in-depth backlink analysis‚ boasting an extensive index that consistently crawls billions of pages. Its Site Explorer tool provides a detailed overview of a website’s backlink profile‚ including referring domains‚ backlinks‚ and organic keywords.

Key features include the ability to analyze link overlap with competitors‚ identify broken backlinks‚ and monitor new and lost backlinks. Ahrefs’ Content Explorer helps discover popular content within your niche‚ revealing potential link-building opportunities.

The platform also offers robust keyword research and rank tracking tools‚ making it a valuable asset for a holistic SEO strategy. Ahrefs’ data accuracy and comprehensive reporting make it a favorite among SEO professionals.

SEMrush: All-in-One SEO Toolkit with Backlink Analysis

SEMrush is a versatile SEO platform offering a robust backlink analysis toolkit alongside its broader suite of features. The Backlink Analytics tool allows users to examine a website’s backlink profile‚ identifying referring domains‚ anchor text‚ and link types.

It provides detailed metrics like Authority Score‚ Trust Flow‚ and Citation Flow to assess backlink quality; SEMrush excels at competitor analysis‚ enabling users to compare backlink profiles and uncover potential link-building targets.

Beyond backlinks‚ SEMrush offers keyword research‚ site audits‚ rank tracking‚ and social media management tools‚ making it a comprehensive solution for digital marketing. Its data-rich reports and user-friendly interface are highly valued.

Moz Pro: Domain Authority and Backlink Metrics

Moz Pro is a leading SEO software renowned for its influential Domain Authority (DA) and Page Authority (PA) metrics‚ crucial for evaluating website strength and backlink quality. Its Link Explorer tool provides in-depth backlink analysis‚ revealing linking domains‚ anchor text distribution‚ and potential link opportunities.

Moz Pro offers detailed reports on link growth‚ identifying new and lost backlinks over time. It also features a robust crawling system to discover all links pointing to a domain.

Beyond backlink analysis‚ Moz Pro includes keyword research‚ rank tracking‚ and site audit features‚ making it a comprehensive SEO solution. Its focus on actionable insights and user-friendly interface makes it popular among SEO professionals.

Step-by-Step Guide to Conducting a Backlink Analysis

Embark on a systematic process: set up tools‚ extract backlinks‚ categorize them‚ assess quality‚ and analyze competitors to refine your SEO strategy.

Step 1: Setting Up Your Tools and Accounts

Initiating a successful backlink analysis begins with establishing access to the necessary tools and platforms. Begin by verifying your website within Google Search Console; this provides foundational backlink data directly from Google’s index. Next‚ consider creating accounts with leading SEO suites like Ahrefs‚ SEMrush‚ or Moz Pro – many offer free trials to explore their capabilities.

Ensure you understand the subscription models and data limits of each tool. For free options‚ Ubersuggest offers a starting point‚ though with limited data compared to paid alternatives. Proper account setup involves verifying website ownership and configuring settings to accurately track backlinks. Familiarize yourself with each tool’s interface and reporting features to maximize efficiency throughout the analysis process. Accurate setup is crucial for reliable data.

Step 2: Extracting a List of All Your Backlinks

Once your tools are configured‚ the next step involves compiling a comprehensive list of all backlinks pointing to your website. Start with Google Search Console‚ which provides a sample of your backlinks – though it’s not exhaustive. Utilize paid tools like Ahrefs or SEMrush for a more complete crawl‚ as they index a significantly larger portion of the web.

Export the backlink data in a CSV or Excel format for easier manipulation and analysis. This list should include the referring domain‚ the URL of the linking page‚ and the anchor text used. Be prepared for potentially large datasets‚ especially for established websites. Regularly updating this list is vital‚ as backlinks are constantly changing.

Step 3: Categorizing and Tagging Your Links

After extracting your backlink list‚ organization is key. Begin by categorizing links as either DoFollow or NoFollow; DoFollow links pass link equity‚ while NoFollow do not. Next‚ classify links by relevance to your niche and the authority of the referring domain. High-quality‚ relevant links from authoritative sites are the most valuable.

Tagging allows for efficient filtering and analysis. Consider tags like “guest post‚” “editorial link‚” or “directory listing.” Identifying potentially toxic links is also crucial at this stage. A well-categorized list enables focused efforts on nurturing valuable links and disavowing harmful ones‚ improving overall SEO performance.

Identifying DoFollow vs. NoFollow Links

Distinguishing between DoFollow and NoFollow links is fundamental to backlink analysis. DoFollow links‚ the default for most links‚ signal to search engines that the linked site is trustworthy‚ passing on “link juice” and boosting rankings. NoFollow links‚ indicated by a rel=”nofollow” attribute‚ instruct search engines not to pass link equity.

While NoFollow links don’t directly improve rankings‚ they can still drive referral traffic and brand awareness. Tools often automatically identify link types‚ but manual verification is recommended. Prioritize building DoFollow links from authoritative sources‚ but don’t dismiss the value of diverse link profiles including NoFollow links.

Classifying Links by Relevance and Authority

Beyond simply identifying backlinks‚ classifying them by relevance and authority is crucial for a successful SEO strategy. Relevance assesses how closely the linking site’s content aligns with your own; highly relevant links signal topical authority to search engines. Authority‚ often measured by metrics like Domain Authority (DA) or Domain Rating (DR)‚ indicates a site’s overall strength and trustworthiness.

Prioritize links from authoritative sites within your niche. A link from a respected industry blog carries more weight than one from a low-quality directory. Categorizing links allows you to focus efforts on nurturing valuable relationships and disavowing potentially harmful‚ irrelevant links.

Step 4: Assessing Backlink Quality

Determining backlink quality is paramount; not all links are created equal. Focus on metrics like Domain Authority (DA) and Page Authority (PA) – higher scores generally indicate stronger‚ more valuable links. However‚ these aren’t the sole indicators. A crucial step involves evaluating a site’s “Spam Score‚” identifying potentially toxic backlinks that could harm your rankings.

Manually review linking sites for relevance‚ user experience‚ and overall trustworthiness. Links from spammy or irrelevant websites can trigger penalties. Prioritize links from established‚ authoritative sources within your industry‚ ensuring they contribute positively to your SEO efforts.

Domain Authority (DA) and Page Authority (PA)

Domain Authority (DA)‚ developed by Moz‚ predicts a website’s ranking strength based on its overall link profile. It’s a score from 1-100‚ with higher numbers indicating greater authority. Page Authority (PA) assesses the predictive ranking power of a specific page‚ also on a 1-100 scale.

While not direct Google ranking factors‚ DA and PA serve as valuable benchmarks for evaluating backlink quality. Links from high-DA/PA domains generally carry more weight. However‚ don’t solely rely on these metrics; relevance and contextual authority are equally important. Use them as a guide alongside other quality assessment factors.

Spam Score and Identifying Toxic Backlinks

Toxic backlinks – links from low-quality‚ spammy‚ or manipulative websites – can severely harm your SEO. Ahrefs’ Spam Score assesses the likelihood of a backlink being toxic‚ ranging from 0-100‚ with higher scores indicating greater risk. Identifying these links is crucial for maintaining a healthy link profile.

Look for backlinks from penalized domains‚ link farms‚ or sites with irrelevant content. Manually review suspicious links and utilize tools to automate the process. Disavowing toxic backlinks through Google Search Console signals to Google to ignore them‚ protecting your site from negative ranking impacts. Regular monitoring is key!

Analyzing Competitor Backlinks

Uncover valuable link opportunities by dissecting your competitors’ backlink profiles‚ revealing their strategies and potential sources for your own link building.

Identifying Key Competitors

Pinpointing your core competitors is the foundational step in effective backlink analysis. Don’t simply list all businesses in your niche; focus on those actively ranking for the same keywords you target. Utilize SEO tools like SEMrush or Ahrefs to identify websites sharing keyword rankings with yours.

Look beyond direct product/service competitors. Consider informational competitors – sites creating content that answers the same questions as your blog posts or guides. Analyze their domain authority and estimated organic traffic. A strong competitor possesses both.

Create a focused list of 3-5 key competitors for in-depth backlink analysis. This manageable number allows for thorough investigation and actionable insights. Regularly revisit this list as the competitive landscape evolves.

Reverse Engineering Competitor Link Profiles

Once key competitors are identified‚ dissect their backlink profiles to uncover valuable opportunities. Tools like Ahrefs and SEMrush allow you to input a competitor’s domain and view all linking websites. Focus on identifying common backlinks – sites linking to multiple competitors‚ indicating potential relevance for you.

Analyze the quality of these links. Are they from authoritative‚ relevant websites‚ or spammy directories? Prioritize links with high Domain Authority (DA) and Page Authority (PA). Examine anchor text used by competitors; this reveals keyword targeting strategies.

Don’t just copy; understand why a site linked to your competitor. Was it a guest post‚ a resource link‚ or earned through exceptional content? This informs your outreach strategy.

Finding Link Opportunities from Competitor Backlinks

Leverage competitor backlink data to pinpoint untapped link opportunities. If a website links to a competitor‚ it’s a potential source for your site‚ assuming relevance. Look for “broken link building” opportunities – links to competitor pages that are now defunct. Offer your content as a replacement!

Identify unlinked brand mentions. If a site mentions your competitor without linking‚ reach out and politely request a link. Explore competitor guest posting opportunities; if they’ve guest posted‚ you can too!

Analyze resource pages in your niche. If competitors are listed‚ pitch your relevant content for inclusion. Remember to personalize outreach and offer genuine value.

Advanced Backlink Analysis Techniques

Delve deeper with anchor text analysis‚ toxic backlink disavowal‚ and continuous monitoring to refine your strategy and maintain optimal link health.

Anchor Text Analysis

Anchor text‚ the visible‚ clickable text in a hyperlink‚ plays a crucial role in SEO. Analyzing it reveals insights into how others perceive your content and the keywords associated with your site. A natural backlink profile exhibits diversity – a mix of branded‚ naked URL‚ generic‚ and keyword-rich anchor text. Over-optimization with exact-match keywords can trigger penalties.

Tools like Ahrefs and SEMrush allow you to easily extract anchor text data from your backlinks. Identify dominant anchor text patterns. Are they overly promotional? Do they accurately reflect your content? A healthy profile avoids unnatural spikes in specific keywords. Monitor for potential issues and adjust your link-building efforts accordingly. Diversification is key to avoiding algorithmic flags and maintaining a robust backlink profile;

Identifying and Disavowing Toxic Backlinks

Toxic backlinks – low-quality‚ spammy links – can severely harm your SEO; Identifying them is crucial for maintaining a healthy backlink profile. Look for links from irrelevant websites‚ link farms‚ or sites with low Domain Authority and high Spam Scores. These links signal to search engines that your site engages in manipulative practices.

Tools like Ahrefs and SEMrush provide metrics to assess backlink toxicity. Once identified‚ don’t simply request removal; often‚ it’s ignored. Instead‚ utilize Google’s Disavow Tool. This informs Google to ignore these links during ranking calculations. Caution: Disavowing is a powerful tool; use it judiciously‚ as incorrectly disavowing good links can negatively impact your rankings. Regularly monitor and update your disavow file.

Monitoring Backlink Growth and Loss

Consistent backlink monitoring is vital for sustained SEO success. Regularly tracking new backlinks helps identify potential opportunities and assess the effectiveness of your link-building efforts. Conversely‚ monitoring backlink loss alerts you to broken links or websites removing their endorsements‚ requiring prompt action.

Utilize tools like Ahrefs‚ SEMrush‚ or Moz Pro to schedule automated backlink monitoring reports. Analyze trends – sudden gains or losses can indicate algorithmic updates or manual penalties. Investigate lost backlinks; attempt to regain them or find replacements; Proactive monitoring allows for swift responses to changes in your backlink profile‚ safeguarding your search engine rankings and overall online visibility.

Using Backlink Analysis for Link Building

Leverage insights from backlink analysis to uncover new link prospects‚ strategically reach out to relevant sources‚ and meticulously track progress.

Finding New Link Opportunities

Backlink analysis isn’t just about assessing existing links; it’s a powerful engine for discovering fresh link-building opportunities. By meticulously examining competitor backlink profiles‚ you can identify websites that link to your rivals but not to you – prime targets for outreach.

Look for broken links on relevant sites and offer your content as a replacement. Utilize keyword research to pinpoint content gaps and create valuable resources that naturally attract backlinks. Explore industry forums and communities‚ contributing insightful answers and linking back to relevant pages on your site.

Don’t overlook guest blogging opportunities on authoritative websites within your niche. Finally‚ monitor social media for mentions of your brand or relevant keywords‚ and proactively reach out to those sharing content to request a link.

Reaching Out to Potential Link Sources

Effective outreach is paramount when pursuing new link opportunities. Personalization is key; avoid generic email blasts. Research each prospect thoroughly‚ demonstrating you understand their content and audience. Clearly articulate the value your resource offers them – how will it benefit their readers?

Keep your emails concise and to the point‚ highlighting the relevance of your content. Offer to reciprocate by sharing their work with your audience. Be polite‚ respectful‚ and patient; follow up once or twice if you don’t receive a response.

Building relationships is more valuable than simply requesting a link. Focus on fostering genuine connections within your industry‚ and the links will often follow naturally.

Tracking Link Building Progress

Consistent monitoring is crucial for evaluating link building success. Utilize backlink analysis tools to track newly acquired links‚ domain authority changes‚ and keyword ranking improvements. Maintain a spreadsheet or project management system to document outreach efforts‚ response rates‚ and link acquisition dates.

Regularly assess which strategies yield the best results – are guest posts more effective than broken link building? Analyze anchor text distribution to ensure a natural profile. Tracking allows for data-driven adjustments to your strategy‚ maximizing ROI.

Don’t solely focus on quantity; prioritize quality links from authoritative sources. Celebrate successes and learn from failures to refine your approach continually.

Backlink Analysis and Algorithm Updates (as of 03/09/2026)

Recent Google updates prioritize link quality and relevance; focus on earning authoritative backlinks and disavowing toxic ones for sustained SEO success.

Impact of Recent Google Updates on Backlink Value

Google’s algorithm updates throughout 2025 and early 2026 have significantly shifted the emphasis in backlink valuation. Previously‚ sheer volume held weight‚ but now‚ quality reigns supreme. The “Helpful Content” and subsequent updates heavily penalize sites with spammy or manipulative link profiles. Links from irrelevant‚ low-authority domains now carry diminished‚ or even negative‚ value.

Furthermore‚ Google’s enhanced spam detection capabilities mean toxic backlinks are identified and devalued more effectively. Anchor text optimization remains important‚ but over-optimized or exact-match anchor text can trigger penalties. Natural‚ diverse anchor text is now favored. The focus is on backlinks that demonstrate genuine endorsement and provide value to users‚ aligning with Google’s core mission of delivering helpful and relevant search results. Therefore‚ a proactive approach to backlink cleanup and earning high-quality links is crucial;

Future Trends in Backlink Analysis

The landscape of backlink analysis is poised for further evolution‚ driven by advancements in AI and machine learning. Expect more sophisticated tools capable of identifying nuanced link schemes and predicting future link value with greater accuracy. Semantic analysis will become increasingly important‚ evaluating the context of backlinks beyond simple metrics like DA/PA.

We’ll likely see a rise in “brand mention” analysis – tracking unlinked mentions as potential link opportunities. Focus will shift towards evaluating the user experience on linking sites‚ not just their authority. Decentralized web technologies (like blockchain) could introduce new challenges and opportunities for link verification. Proactive monitoring for link decay and algorithmic shifts will be essential‚ demanding continuous adaptation and a holistic approach to link equity.

Instructions

hicolor instructions

HiColor Instructions: A Comprehensive Guide (Updated 03/05/2026)

L’Oréal HiColor offers vibrant‚ long-lasting color‚ especially for dark hair‚ resisting fading with a unique formula and providing intense shades like red and violet.

Understanding L’Oréal HiColor Highlights

L’Oréal HiColor Highlights represent a significant advancement in at-home hair coloring‚ specifically designed to deliver vibrant and noticeable highlights‚ even on darker hair shades. Unlike traditional highlighting kits that often require pre-lightening‚ HiColor’s unique formula is engineered to lift dark hair – from black to medium brown – up to 3-4 levels without resulting in unwanted brassiness.

This is achieved through a breakthrough technology‚ particularly evident in the HiColor Red HiLights range‚ which provides highly visible red highlights without the typical brassy undertones. The line includes permanent hair color options‚ like L’Oréal Excellence HiColor‚ formulated with an anti-breakage ceramide R complex to help maintain hair’s integrity during the coloring process.

Furthermore‚ HiColor offers a diverse palette‚ extending beyond reds to include intense violet and black shades‚ catering to a wide range of desired looks. The no-drip crème formula ensures easy application and minimizes mess‚ making it a popular choice for achieving salon-quality highlights at home.

What is HiColor and Who is it For?

L’Oréal HiColor is a high-quality hair dye line renowned for its rich‚ true-to-shade color and exceptional resistance to fading. It’s particularly celebrated as the first permanent hair color specifically created for those with dark hair – ranging from black to medium brown – offering a solution to achieve noticeable color changes without the common issue of brassiness.

This makes HiColor ideal for individuals who struggle to achieve vibrant highlights or all-over color with traditional dyes. The range caters to those seeking bold shades‚ including intense reds‚ striking violets‚ and deep blacks. It’s also suitable for those with previously colored hair‚ though pre-toning may be recommended for uneven results.

Essentially‚ HiColor is for anyone desiring a dramatic color transformation‚ especially if they have darker hair and want to avoid brassy tones or the need for pre-lightening. The easy-to-use formula empowers users to achieve salon-like results at home.

HiColor vs. Traditional Hair Dye

L’Oréal HiColor distinguishes itself from traditional hair dye primarily through its formulation for dark hair. While many dyes struggle to deliver vibrant results on darker shades without pre-lightening‚ HiColor is specifically engineered to lift dark hair up to 3-4 levels in a single step‚ eliminating brassiness – a common frustration with conventional dyes.

Traditional dyes often require multiple applications or pre-treatment to achieve similar lift and vibrancy‚ potentially causing increased damage. HiColor’s unique formula‚ coupled with its no-drip crème consistency‚ aims for a more efficient and less damaging coloring process.

Furthermore‚ HiColor offers specialized lines like HiLights‚ designed for highly visible highlights‚ and Technique HiColor‚ focusing on intense shades and anti-breakage benefits. Traditional dyes may not provide the same level of targeted solutions for specific color goals or hair concerns.

Preparing for Your HiColor Application

Prior to application‚ complete a patch test‚ gather all necessary supplies‚ and carefully assess your current hair color and condition for optimal results.

Patch Test: A Crucial First Step

Before embarking on your HiColor journey‚ performing a patch test is absolutely essential. This seemingly small step can prevent significant discomfort and potential allergic reactions. Apply a tiny amount of the mixed HiColor formula to a discreet area of skin – ideally behind your ear or on your inner elbow.

Cover the area and allow it to develop for the full recommended processing time‚ typically around 30-45 minutes. During this period‚ carefully monitor the area for any signs of irritation‚ such as redness‚ itching‚ burning‚ or swelling.

If any adverse reaction occurs‚ immediately rinse the area thoroughly with water and discontinue use of the product. A negative result – meaning no irritation develops – indicates you can proceed with the full application‚ but it doesn’t eliminate all risks‚ so remain vigilant throughout the process. Skipping this step is simply not worth the potential consequences.

Gathering Your Supplies

Successful HiColor application hinges on having everything readily available before you begin. You’ll need two boxes of your chosen HiColor shade – remember‚ opening both dye boxes and squeezing the contents into a mixing bowl is crucial‚ especially for longer or thicker hair.

Essential tools include a non-metallic mixing bowl and applicator brush‚ protective gloves (usually included in the kit‚ but have extras on hand!)‚ an old towel to protect your clothing‚ and sectioning clips to manage your hair.

Consider having a petroleum jelly or barrier cream to apply along your hairline to prevent staining of the skin. A timer is vital for accurate processing time‚ and a deep conditioner is recommended for post-color care. Ensure you have a well-ventilated space to work in‚ and prepare for potential brassiness with a toning product if needed.

Assessing Your Current Hair Color & Condition

Before diving into HiColor‚ honestly evaluate your starting point. If your hair is already colored‚ understand that HiColor on previously colored hair can yield unpredictable results‚ potentially requiring pre-toning to address brassiness or unevenness.

Dark hair (black to medium brown) is HiColor’s specialty‚ designed to lift color without excessive brassiness. However‚ the extent of lift depends on your current shade and hair health.

Assess your hair’s condition: is it dry‚ damaged‚ or prone to breakage? Damaged hair may require extra conditioning treatments before and after coloring. If your hair is very brassy and uneven‚ toning before application is highly recommended. Consider a strand test to preview the color outcome and assess how your hair reacts to the formula.

The HiColor Application Process

HiColor application involves mixing the dye from both tubes into a mixing bowl‚ ensuring even coverage‚ and carefully monitoring the processing time for optimal results.

Mixing the HiColor Formula: Step-by-Step

Successfully applying HiColor begins with precise formula mixing. Open both HiColor dye boxes – this is crucial as the color relies on combining the contents of both tubes. Carefully squeeze all the contents from both tubes into a clean mixing bowl.

Thoroughly combine the two formulas‚ ensuring a homogenous blend. The consistency should be creamy and uniform‚ free of any streaks or unmixed portions. Remember‚ the amount of mix needed depends on hair length and thickness; a third might remain for long‚ thick hair.

If your hair is noticeably brassy or uneven in tone‚ consider a pre-toning treatment before mixing and applying the HiColor formula. This will create a more even base for the color to adhere to‚ resulting in a truer‚ more vibrant shade.

For lifting darker shades‚ a 30-volume developer is generally suitable‚ but always refer to the specific instructions on your HiColor kit.

Application Techniques for Even Coverage

Achieving consistent color with HiColor requires careful application. Begin by sectioning your hair into manageable portions – this ensures every strand receives adequate coverage. Apply the mixed HiColor formula evenly‚ starting at the roots and working your way down the hair shaft.

For highlights‚ focus on applying the formula to the desired strands‚ ensuring complete saturation. Avoid overlapping previously colored sections to prevent damage and uneven results. Utilize a brush or applicator bottle for precise control and minimize mess.

The no-drip crème formula aids in controlled application‚ but working quickly is still recommended. Ensure each section is thoroughly coated‚ paying attention to the hairline and any areas prone to uneven color uptake.

Consistent application is key to vibrant‚ uniform highlights‚ especially when aiming for highly visible red highlights on dark hair.

Processing Time: How Long to Leave it On

HiColor’s processing time is crucial for achieving optimal results. Generally‚ leave the formula on for 30-45 minutes‚ but this can vary based on your hair’s texture‚ porosity‚ and desired level of lift. Regularly check the color development‚ especially if you’re aiming for significant lightening.

For dark hair‚ HiColor is formulated to lift 3-4 levels without pre-lightening‚ but monitoring progress is still essential. If your hair is brassy or uneven‚ toning before application can improve the final outcome. Using a 30-volume developer is often suitable for lifting color.

Avoid exceeding the recommended processing time‚ as this can lead to damage. Rinse thoroughly with cool water once the desired color is achieved‚ and follow with a color-safe shampoo and conditioner.

HiColor for Different Hair Types & Colors

HiColor excels on dark hair‚ lifting without brassiness‚ and works well on previously colored hair; red highlights are achievable with the specialized HiLights Red formula.

HiColor on Dark Hair (Black to Medium Brown)

L’Oréal Excellence HiColor is specifically formulated for dark hair‚ ranging from black to medium brown‚ offering a breakthrough in achieving vibrant color without the common issue of brassiness. This innovative formula is designed to lift dark hair in a single step‚ eliminating the need for pre-lightening‚ a process that can often cause damage and uneven results.


The unique multi-lift technology effectively penetrates the hair shaft‚ delivering rich‚ true-to-shade color that is highly visible even on the darkest bases. It’s particularly effective for those seeking bold shades like red or violet‚ providing a noticeable transformation. However‚ if your hair exhibits significant brassiness or uneven tones before application‚ it’s strongly recommended to tone it beforehand to ensure optimal results and a cleaner‚ more predictable color outcome.

When choosing a developer volume‚ a 30 volume is generally suitable for lifting the color‚ especially if you’re aiming for a lighter shade. Remember to follow the instructions carefully and perform a strand test to assess the color development and ensure it meets your expectations.

HiColor on Previously Colored Hair

Applying HiColor to previously colored hair requires careful consideration‚ as the existing color and hair condition will significantly impact the final result. It’s crucial to assess the current state of your hair – is it damaged‚ porous‚ or exhibiting uneven color? Porosity‚ in particular‚ affects how readily the hair absorbs color‚ potentially leading to unpredictable outcomes.

If your hair has undergone multiple coloring processes‚ it may be more susceptible to damage. In such cases‚ prioritize hair health with deep conditioning treatments before and after application. Be mindful that layering color can create unexpected tones‚ so selecting a shade that complements the existing color is vital.

A strand test is especially important when working with previously colored hair. This allows you to preview the color development and identify any potential issues before committing to a full application. Consider a lower developer volume to minimize further damage and maintain hair integrity.

HiColor for Achieving Red Highlights

L’Oréal HiColor HiLights Red is specifically formulated to deliver highly visible red highlights‚ even on dark hair‚ without the unwanted brassiness often associated with highlighting darker shades. This breakthrough technology lifts hair 3-4 levels without requiring pre-lightening‚ simplifying the process.

For optimal results‚ ensure even application‚ focusing on desired highlight areas. The no-drip crème formula aids in precise placement and minimizes mess. Remember‚ the existing hair color will influence the final red tone; darker hair will yield a richer‚ deeper red‚ while lighter hair will showcase a brighter shade.

If your hair is already brassy or unevenly toned‚ consider a pre-toner to neutralize unwanted undertones before applying the red highlights. This will create a cleaner base for the red pigment‚ ensuring a truer‚ more vibrant result. Always perform a strand test to preview the color and assess processing time.

Troubleshooting Common HiColor Issues

Dealing with brassiness requires toning before color application‚ while uneven results suggest reapplication or professional help; minimizing damage involves deep conditioning treatments.

Dealing with Brassiness After HiColor

Brassiness is a common concern after using HiColor‚ particularly when lifting dark hair. The formula‚ while designed to minimize this‚ can sometimes leave unwanted warm tones. If your hair is really brassy and uneven‚ a crucial first step is to tone it before attempting to re-apply color. This neutralizes the orange or yellow undertones‚ creating a cleaner base for the desired shade.

Utilize a purple or blue-toned shampoo and conditioner – these counteract brassiness effectively. Leave the shampoo on for several minutes before rinsing to allow the toning agents to work. For more intense correction‚ consider a dedicated toner. Remember to follow the toner’s instructions carefully to avoid over-toning‚ which can result in a cool‚ ashy cast.

Regular use of color-safe‚ sulfate-free shampoos and deep conditioning treatments will also help maintain the vibrancy of your HiColor and prevent future brassiness. Protecting your color from heat styling is also essential.

Uneven Color Results: What to Do

Uneven color after a HiColor application can be frustrating‚ but often correctable. Several factors contribute to this‚ including inconsistent application‚ varying hair porosity‚ or previously processed hair. First‚ assess the extent of the unevenness. If it’s minor‚ a color-correcting shampoo or gloss can sometimes blend the tones.

For more significant discrepancies‚ a touch-up application might be necessary. Open both Hicolor dye boxes and squeeze the contents of both tubes into the mixing bowl to ensure consistent color matching. Focus the application solely on the areas that need correction‚ avoiding overlap onto already well-colored sections.

If the unevenness is severe or you’re unsure about proceeding‚ consulting a professional colorist is recommended. They can accurately diagnose the issue and provide a tailored solution to achieve a uniform‚ beautiful result. Avoid repeated‚ full-head applications‚ as this can lead to damage.

Minimizing Hair Damage During & After Coloring

HiColor‚ while delivering vibrant results‚ can be potentially damaging‚ especially for already compromised hair. Minimizing damage starts with preparation – ensuring your hair is healthy before application. A deep conditioning treatment a week prior can help strengthen strands.

During the coloring process‚ avoid exceeding the recommended processing time. Over-processing leads to increased fragility and breakage. If your hair is really brassy and uneven‚ tone it before you apply the color to reduce the need for multiple applications.

Post-coloring care is crucial. Utilize shampoo & conditioner for color-treated hair‚ as these are formulated to be gentler and help preserve color. Incorporate regular deep conditioning treatments to replenish moisture and repair damage. Protect your hair from heat styling and UV exposure‚ both of which can exacerbate damage and fade color.

Post-HiColor Hair Care

Maintaining HiColor’s vibrancy requires specialized care‚ including color-safe shampoos‚ deep conditioning‚ and protection from heat and UV exposure to prevent fading.

Shampoo & Conditioner for Color-Treated Hair

Selecting the right shampoo and conditioner is paramount after a HiColor application to preserve the vibrancy and longevity of your new shade. Traditional shampoos often contain harsh sulfates that strip color molecules‚ leading to premature fading and dullness. Opt for formulas specifically designed for color-treated hair; these are typically sulfate-free and contain ingredients that help seal the hair cuticle.

Look for shampoos enriched with antioxidants‚ like Vitamin E‚ and UV filters to protect against environmental damage. Conditioners formulated for color-treated hair replenish moisture lost during the coloring process and help maintain color intensity. Consider using a color-depositing conditioner periodically to refresh your shade between applications.

Avoid clarifying shampoos‚ as they are designed to remove buildup and will inevitably remove color as well. When washing‚ use lukewarm water instead of hot water‚ as heat opens the cuticle and allows color to escape. Consistent use of color-safe products will significantly extend the life of your HiColor highlights and keep your hair looking radiant.

Deep Conditioning Treatments

HiColor application‚ while delivering vibrant results‚ can be inherently drying due to the lifting process. Incorporating regular deep conditioning treatments into your hair care routine is crucial for restoring moisture‚ strengthening strands‚ and preventing breakage. These treatments penetrate the hair shaft‚ providing intense hydration and repairing damage caused by coloring.

Look for deep conditioners containing ingredients like argan oil‚ shea butter‚ or keratin. Apply the treatment to clean‚ damp hair‚ ensuring even distribution from root to tip. Cover your hair with a plastic cap or warm towel to trap heat‚ which helps the conditioner penetrate more effectively.

Leave the treatment on for 20-30 minutes‚ or as directed on the product label. Frequency depends on your hair’s condition – weekly treatments are ideal for damaged hair‚ while bi-weekly may suffice for healthier strands. Deep conditioning will not only improve the health of your hair but also enhance color vibrancy and shine.

Protecting Your Color from Fading

Maintaining the vibrancy of your HiColor highlights requires diligent aftercare to prevent premature fading. Several factors contribute to color loss‚ including sun exposure‚ heat styling‚ and harsh shampoos. Minimize these effects by adopting a color-conscious hair care regimen.

Always use a shampoo and conditioner specifically formulated for color-treated hair; these are sulfate-free and gentler on colored strands. Limit washing your hair to 2-3 times per week to retain natural oils and prevent color stripping. When exposed to the sun‚ wear a hat or use a UV protectant spray to shield your hair from damaging rays.

Reduce heat styling as much as possible‚ and when you do use tools like blow dryers or curling irons‚ apply a heat protectant spray beforehand. Consider rinsing your hair with cool water after conditioning to seal the cuticle and lock in color. These simple steps will significantly extend the life of your HiColor results.

HiColor Product Range Overview

L’Oréal HiColor includes HiLights Red for vibrant highlights‚ Excellence for permanent color on dark hair‚ and Technique Violet & Blacks for bold‚ multi-dimensional shades.

L’Oréal HiColor HiLights Red

L’Oréal HiColor HiLights Red represents a breakthrough in achieving highly visible red highlights‚ specifically formulated to avoid brassiness on darker hair shades. This innovative product is designed to lift hair color by 3-4 levels without the necessity of pre-lightening‚ simplifying the highlighting process for home users.

The formula utilizes a no-drip crème consistency‚ ensuring easy and controlled application. To achieve optimal results‚ it’s crucial to open and combine the contents of both dye boxes into a mixing bowl. Users with very long or thick hair may require additional developer‚ as demonstrated in tutorials where approximately one-third of the mixed formula remained after full application.

This HiColor variant is particularly effective for those seeking a vibrant red tone without compromising hair health. It’s a popular choice for individuals looking to add dimension and color to their hair‚ offering a noticeable change without the complexities of traditional highlighting methods.

L’Oréal Excellence HiColor Permanent Hair Color

L’Oréal Excellence HiColor Permanent Hair Color is specifically engineered for dark hair – ranging from black to medium brown – offering a solution to achieve vibrant color in a single step‚ while effectively minimizing brassiness. This unique formulation is designed to lift dark pigments‚ delivering true-to-shade results that resist fading‚ ensuring long-lasting color vibrancy.

For individuals with uneven or brassy tones prior to application‚ a toning treatment is highly recommended to create a balanced base. A 30-volume developer is generally suitable for lifting color‚ particularly when aiming for lighter shades. The HiColor range provides intense color options‚ including reds and violets‚ catering to diverse preferences.

This permanent hair color utilizes advanced technology to deliver rich‚ consistent color‚ making it a popular choice for those seeking a noticeable and long-lasting transformation without multiple processing steps.

L’Oréal Technique HiColor Violet & Blacks

L’Oréal Technique HiColor Violet & Blacks represents a bold step in hair coloring‚ offering intensely vibrant shades specifically formulated for impactful results. This line features a unique Anti-Breakage Ceramide R Complex‚ designed to fortify hair during the coloring process‚ minimizing damage and promoting overall hair health.

The Multi-Lift technology within the HiColor Violet & Blacks range allows for significant color lift without the need for pre-lightening‚ making it a convenient option for achieving dramatic transformations. This is particularly beneficial for those seeking deep violet or striking black hues with maximum impact and minimal processing.

These colors deliver long-lasting vibrancy and are ideal for individuals looking to express their individuality through bold and unconventional hair color choices. The formula ensures a rich‚ even application and a noticeable‚ head-turning finish.

PreviousNext

You Want To Have Your Favorite Car?

We have a big list of modern & classic cars in both used and new categories.